


CCTV CAMERA BRACKET POLE-MOUNT PFA150 PFA152 PFA139 PFA110 WALL-MOUNT PFB303W PFB121W BULLET PFB203W DOME CEILING-MOUNT DAHUA CCTV SECURITY SYSTEM BRACKET
in stock
$25.00
DAHUA SINGAPORE OFFICIAL PARTNER FULL RANGE
Supply and Maintenance DAHUA CCTV IP Cameras, NVR, Turbo HD TVI Cameras, DVR, PTZ Cameras,
Access Control System, Video Intercom.
Sim Lim Square 02-81 10am-7pm Daily.
Whatsapp Enquiry Project +65 98534404, Technical Support +65 81120788, Site Visit Maintenance +65 81985572.
in stock
Add to WishlistAdd to CompareCCTV CAMERA BRACKET POLE-MOUNT PFA150 PFA152 PFA139 PFA110 WALL-MOUNT PFB303W PFB121W BULLET PFB203W DOME CEILING-MOUNT DAHUA CCTV SECURITY SYSTEM BRACKET
CHOICECYCLE CCTV offer the best CCTV CAMERA BRACKET POLE-MOUNT PFA150 PFA152 PFA139 PFA110 WALL-MOUNT PFB303W PFB121W BULLET PFB203W DOME CEILING-MOUNT DAHUA CCTV SECURITY SYSTEM BRACKET
CCTV Bracket Security Camera Bracket ex-stock or lead time 5-7 working days.
CCTV bracket mounts enable you to find the best possible placement for your cameras.
SGCCTV supplies various types of mounts and brackets for CCTV cameras, including AHD and network IP cameras.
This page contains mounted bracket for dome, box, and weatherproof camera housings.
If you need assistance in choosing the right mounting bracket for your installation, please contact us. We are here to help.
CCTV Bracket Types
- Plastic wall bracket specifically designed for IP dome camera.
- Metal Ceiling Pendant
- Mount for drop-ceilings
- Wall mount bracket
- Metal wall bracket specifically designed for the IP panoramic camera.
- Parapet Wall Mount for PTZ cameras.
- Pole Mount Bracket for IP PTZ cameras
1. Collection from SGCCTV Choicecycle Sim Lim Square CCTV SPECIALIST #02-81 11am~8pm. Whatsapp 98534404 for stock level before visit.
2. Payment by PayNow 201207820G or QR code will receive Free Gift Warning Stickers worth $20.00 (1pc per client order)
3. Please add $18.00 for delivery – 3~5 days.
4. Can issue e-Invoice for your accounting. (upon request)
Dahua WizSense Human Vehicle Detection Perimeter Protection || Dahua Video Intercom FACT ASI3214A-W ASI3213A-W ASI3223A ASA3223A-W ||
DAHUA DAHUA Smart Dual Illuminators Network PT Camera || 2MP HD-CVI Bullet Camera || 2MP HD-CVI Dome Camera ||
2MP Dome IPC HDBW2230E || 2MP Bullet IPC-HFW2431S-S-S2 || 5MP FISHEYE IPC-EW5541-AS || 8MP 4K IPC-HDBW2831E-S-S2 ||
8MP IPC-HFW2831S-S-S2 || 4MP PTZ IPC-HDBW5431RPZE || 25x PTZ DH-SD49225T-HN || 25x DH-SD49225XA-HNR ||
More Common choice to meet your needs: C2PP || Fisheye 360 degree CC380PF || C1C || C1HC || C3A Battery Camera || C6CN || C6TC || HIK Q1 || USB2052MP || Dahua 2C || 5G 2.4G Pan Tilt Camera CC524PT ||
More Choice : Battery-Powered Camera BC1-B1 || IP CAMERA Outdoor C3W || Hikvision 5MP Fisheye DS-2CD2955FWD-I || Dual-Band IP CAMERA 5G C6P || IP Camera Dual-band 2.4-5G ||
12MP Fisheye-Network Camera CC81IPC59AE ||
CCTV CAMERA BRACKET POLE-MOUNT PFA150 PFA152 PFA139 PFA110 WALL-MOUNT PFB303W PFB121W BULLET PFB203W DOME CEILING-MOUNT DAHUA CCTV SECURITY SYSTEM BRACKET
All equipment and materials used shall be standard components, regularly manufactured, regularly utilized in the manufacturer’s system.
Camera mount designed specifically for indoor/outdoor use along with any accessories which may be required for a complete camera mount. Our components shall have been thoroughly tested and proven in actual use.
Security Camera Brackets Installation
Prior to installation and use of this product, the following WARNINGS should be observed.
1. Installation and servicing should only be done by qualified service personnel and conform to all local codes.
2. Only use replacement parts recommended.
3. The installation method and materials should be capable to supporting four times the weight of the enclosure, pan/tilt, camera and lens combination.
INSTALLATION
- Remove the cover.
- Determine the mounting location. Using the mount as a template, mark the feed through hole and keyhole slot positions on the mounting surface.
- Drill the feed through holes and pull the wires through the wall. NOTE: Make certain that the mounting surface is able to support four times the combined weight of the mount and camera.
- Fasten screws into the mounting surface at the marked keyhole locations. Pull the wires through the feed-through holes in the back of the mount and attach the mount over the heads of the screws. Slide the mount downward to lock into place. Tighten the screws.
- Once the mount is fastened securely to the wall, thread the wires through the top feed through holes.
- The tilt angle of the camera can be adjusted with a screwdriver by loosening, and then tightening, the screws on the sides of the tilt table.
CCTV camera brackets are essential components in the installation and mounting of closed-circuit television (CCTV) cameras for security and surveillance purposes. These brackets come in various types and designs to suit different installation needs. Here’s how some of the mentioned CCTV camera brackets work:
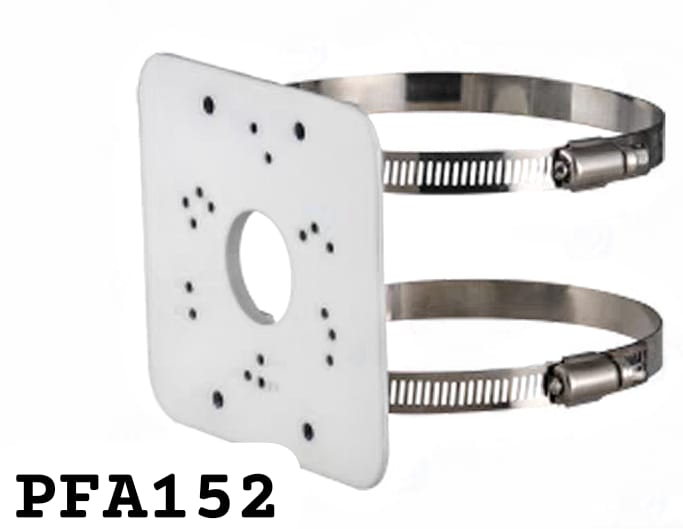
- Pole-Mount Brackets (PFA150, PFA152, PFA139, PFA110): These brackets are designed to be attached to poles or other cylindrical structures, making them suitable for outdoor installations. They typically come with adjustable arms and clamps that secure the CCTV camera in place. The exact working mechanism may vary from model to model, but they generally involve clamping the camera housing to the pole and allowing for rotation and tilting to achieve the desired camera angle.
- Wall-Mount Brackets (PFB303W, PFB121W): Wall-mount brackets are designed to be fixed to vertical surfaces such as walls. They are often equipped with swivel and tilt mechanisms to adjust the camera’s angle and direction. The camera is attached to the bracket, and the bracket is then securely mounted on the wall. Wall-mount brackets are ideal for indoor and outdoor installations.
- Bullet Camera Brackets (PFB203W): Bullet cameras typically come with their own mounting brackets, which can vary in design. The PFB203W is likely a specific model designed to mount a particular type of bullet camera. These brackets often consist of a base plate and adjustable arms to hold the bullet camera securely and allow for angle adjustments.
- Dome Ceiling-Mount Brackets: Dome cameras are usually mounted on ceilings, and their brackets are specifically designed for this purpose. These brackets attach to the ceiling, and the camera is mounted on the bracket’s arm or base. Ceiling-mount brackets allow for easy adjustment of the camera’s viewing angle.
The exact installation process may vary depending on the brand and model of the CCTV camera and bracket you are using. Typically, you’ll need to follow the manufacturer’s instructions for assembly and installation. The key components of these brackets include clamps, brackets, screws, and adjustment mechanisms to position and secure the camera in the desired direction.
When setting up a complete Dahua CCTV security system, it’s essential to use compatible brackets and follow the manufacturer’s guidelines to ensure that the cameras are correctly positioned and secure for effective surveillance. Additionally, these brackets are designed to withstand various environmental conditions, making them suitable for both indoor and outdoor use.
CCTV CAMERA BRACKET POLE-MOUNT PFA150 PFA152 PFA139 PFA110 WALL-MOUNT PFB303W PFB121W BULLET PFB203W DOME CEILING-MOUNT DAHUA CCTV SECURITY SYSTEM BRACKET
MINIMUM 10 PIECES
IP Camera CCTV Singapore Hikvision Singapore Dahua Singapore AIPHONE Access Control Video Intercom
Choicecycle SGCCTV Sim Lim Square 02-81 Whatsapp +65 98534404 [email protected]
https://sgcctv.biz (CCTV Promotion Installation Home Office Shops WareHouse)
https://www.choicecycle.com.sg (Distribution Hikvision Dahua Aiphone Panasonic Samsung)
https://www.sgcctv.biz (CCTV Accessories Adapter Switch BNC Connectors Housing Bracket Server Rack Cables Hard disk Monitor Mobile DVR Bus CCTV)
https://simlimsquare.com.sg/product/hikvision-2megapixels-wifi-camera-free-64gb-sd-card/ (Sim Lim Square Singapore Biggest IT Mall)
https://www.facebook.com/sgcctv.com.sg/ (Job Opportunities for Intern, Project Manager, Sales & Technician)
https://www.linkedin.com/company/choicecycle-cctv-pte-ltd/
(Jobs & Business Collaboration)
CCTV CAMERA BRACKET POLE-MOUNT PFA150 PFA152 PFA139 PFA110 WALL-MOUNT PFB303W PFB121W BULLET PFB203W DOME CEILING-MOUNT DAHUA CCTV SECURITY SYSTEM BRACKET
Dahua Technology is a leading provider of security and surveillance solutions worldwide, and their CCTV systems are widely deployed in various countries, including Singapore, Malaysia, and Indonesia.
Here are some reasons why Dahua CCTV systems are a popular choice:
- Advanced Technology: Dahua is known for its cutting-edge technology and innovation in the security industry.
They offer a wide range of high-quality CCTV products that incorporate the latest advancements, such as high-resolution cameras, smart analytics, facial recognition, and low-light performance. - Wide Product Range: Dahua provides a comprehensive portfolio of CCTV products to meet different security needs.
They offer a variety of cameras, including dome cameras, bullet cameras, PTZ cameras, and specialized cameras for specific applications like thermal imaging and panoramic views.
They also offer NVRs (Network Video Recorders) and VMS (Video Management Systems) for effective video storage and management. - Reliability and Durability: Dahua products are known for their reliability and durability.
They are built with high-quality components and undergo rigorous testing to ensure their performance in various environmental conditions.
Dahua’s systems are designed to be robust and long-lasting, providing peace of mind to users. - Scalability: Whether you need a small-scale surveillance system or a large-scale deployment,
Dahua offers solutions that can be easily scaled to accommodate your requirements.
Their systems support integration with multiple cameras and devices, allowing for flexible and expandable installations. - User-Friendly Interface: Dahua focuses on user experience and provides intuitive interfaces for easy configuration and operation.
Their CCTV systems offer user-friendly management software, mobile apps, and web interfaces that make it convenient to monitor and control the security system remotely. - Integration Capabilities: Dahua CCTV systems can be seamlessly integrated with other security systems and third-party devices, such as access control systems, alarm systems, and video analytics platforms.
This integration enhances the overall security capabilities and allows for a more comprehensive surveillance solution. - Industry Compliance: Dahua products comply with international industry standards and certifications, ensuring that they meet the required security and quality standards.
This compliance gives users confidence in the reliability and performance of their CCTV systems. - Strong Support Network: Dahua has a global presence and a strong support network in Singapore, Malaysia, and Indonesia.
They provide excellent technical support, training, and after-sales services, ensuring that customers receive prompt assistance and maintenance when needed.
It’s important to note that while Dahua is a reputable brand with a wide range of benefits,
it’s always recommended to evaluate your specific security requirements and consult with a professional to determine the best CCTV system for your needs.


Nunc lacus elit, faucibus ac laoreet sed, dapibus ac mi. Maecenas eu ante a elit tempus fermentum. Aliquam commodo tincidunt semper. Phasellus accumsan, justo ac mollis pharetra, ex dui pharetra nisl, a scelerisque ipsum nulla ac sem. Cras eu risus urna. Duis lorem sapien, congue eget nisl sit amet, rutrum faucibus elit.
Donec accumsan auctor iaculis. Sed suscipit arcu ligula, at egestas magna molestie a. Proin ac ex maximus, ultrices justo eget, sodales orci. Aliquam egestas libero ac turpis pharetra, in vehicula lacus scelerisque. Vestibulum ut sem laoreet, feugiat tellus at, hendrerit arcu.
Nunc lacus elit, faucibus ac laoreet sed, dapibus ac mi. Maecenas eu ante a elit tempus fermentum. Aliquam commodo tincidunt semper. Phasellus accumsan, justo ac mollis pharetra, ex dui pharetra nisl, a scelerisque ipsum nulla ac sem. Cras eu risus urna. Duis lorem sapien, congue eget nisl sit amet, rutrum faucibus elit.
Reviews
There are no reviews yet.